This page looks best with JavaScript enabled

Machine Learning Tutorial - Lesson 12

Lesson 12 out of 12

 ·   ·  ☕ 10 min read · 👀... views
All these tutorial are written by me as a freelancing working for tutorial project AlgoDaily. These has been slightly changed and more lessons after lesson 12 has been added to the actual website. Thanks to Jacob, the owner of AlgoDaily, for letting me author such a wonderful Machine Learning tutorial series. You can sign up there and get a lot of resources related to technical interview preparation.

Practical Exercise: Create background removing application for Zoom/Skype

Introduction

This lesson is an exercise for everyone to apply machine learning to regular applications that we might need. We will create an application that can take the input from the webcam, remove the background from persons (without any green screen), and then transfer it to a virtual device that can be selected by other applications like Zoom or Skype. We will use only Linux operating system for virtual device creation and provide instructions on how to create DirectShow virtual camera devices on windows using OBS-virtual-Camera DLLs.

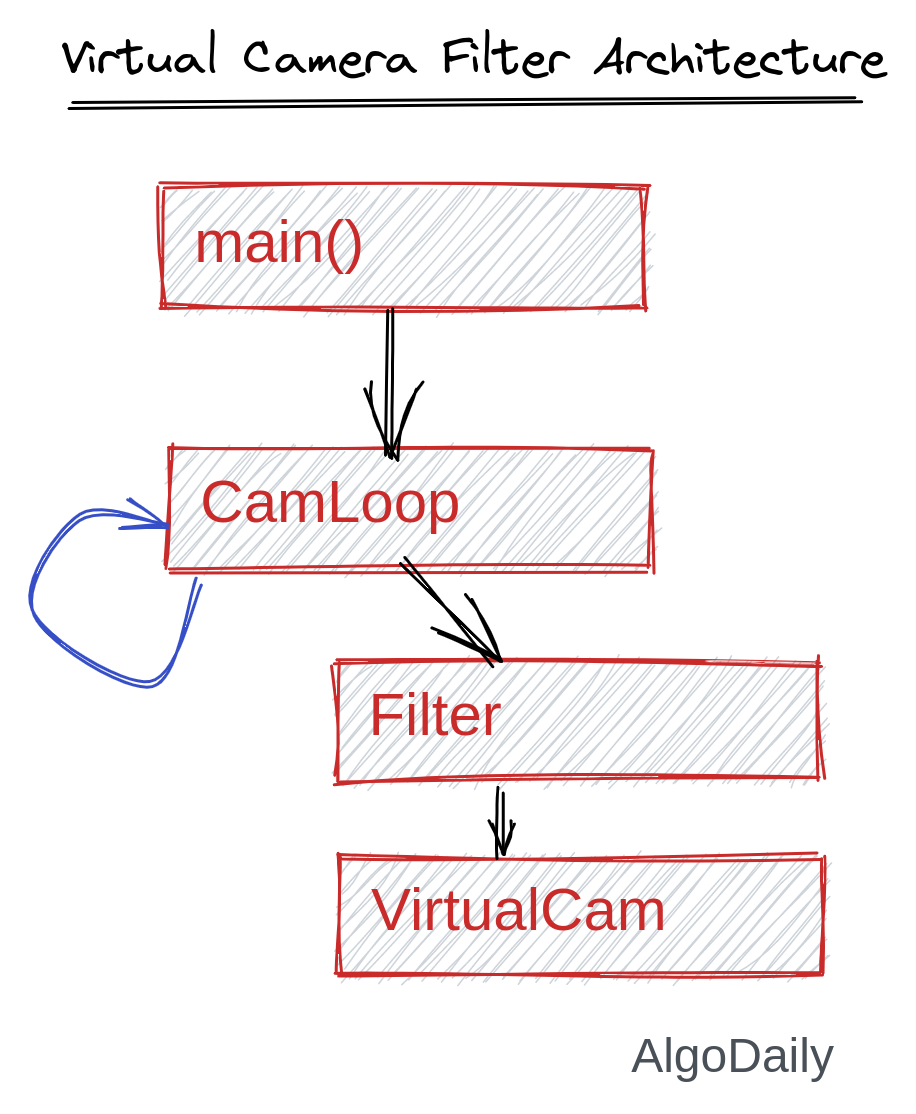
General Architecture

The main architecture of the software is given below:

vcam-arch

The complete file structure is provided below so that you understand which file to create where:

1
2
3
4
5
6
7
.
├── BackgroundRemove.py : The filter we will use. This is the background remover, you can create anything else you want
├── deeplabv3_mnv2_pascal_train_aug : The large saved model will be here
│   └── saved_model.pb
├── main.py : The entry point
├── v4l2.py : Virtual Device image sending utility
└── VirtualCam.py : Virtual Cam Manager

Virtual Camera

First, we will create a class names VirtualCam.py which will be responsible for all the virtual camera management. It will have a function named send that we will use to send images to the newly created sink device. First, we need to download a utility script for Linux to manage a /dev/video device. Create a project directory with any name you want. Then download the v4l2.py file from here and place it into the root directory of the project.

Now create another file named VirtualCam.py and write a class template inside that file:

 1
 2
 3
 4
 5
 6
 7
 8
 9
10
11
12
13
14
15
16
17
18
19
20
21
# We will need these libraries to work in this class
import time
import numpy as np
import os
import fcntl
from v4l2 import (
    v4l2_format, VIDIOC_G_FMT, V4L2_BUF_TYPE_VIDEO_OUTPUT, V4L2_PIX_FMT_RGB24,
    V4L2_FIELD_NONE, VIDIOC_S_FMT
)
    
class VirtualCam:
    def __init__(self, width, height):
        pass

    # This is needed to clean up the camera when
    # object is destroyed
    def __del__(self):
        pass

    def send(self, frame):
        pass

For now, we will create a virtual camera for Linux-based Operating Systems. At the end of the lesson, I will leave some notes if you want to create a virtual camera for Windows. Because configuring the virtual device on Linux is just simpler than the other, I chose this one to implement so we can focus more on the machine learning/image filtering part.

We need to implement all the functions. First, we will initialize a virtual camera and set the correct properties of the video format we will pass to send to the virtual device. This will allow other applications to understand the camera properties and connect to the camera. A loopback device module will be created and registered to the Linux Kernel. We need a program named v4l2loopback-dkms for this. Install the program using this command:

1
sudo apt-get install -y v4l2loopback-dkms

If you are using an Arch Linux-based distro (e.g. Manjaro), you can install the v4l2loopback-dkms package from AUR. There are a lot of instructions to install this package for other Linux distributions. After installing this, we will have a command named modprobe v4l2loopback which will help us to register a new virtual camera device to the kernel.

1
modprobe v4l2loopback devices=1 exclusive_caps=1 video_nr=5 card_label="vCam"

Note: You will need root privileges to do this. Either you have to always run the python program as root, or you can add pkexec before the command so it will as for admin password when the command runs.

The description of each parameter is given below:

1
2
3
4
device: The number of devices needed for camera
exclusive_caps: Allow other devices to see this camera as external
video_nr: The video number of the camera. This will create a device in /dev/video5 (gives error if it is already occupied)
card_label: The name of the camera, you can change it to whatever you like

After creating the camera, we set its properties (height, width, format, etc.). And in the __del__ method, we delete the device and remove the v4l2loopback kernel module.

 1
 2
 3
 4
 5
 6
 7
 8
 9
10
11
12
13
14
15
16
17
    def __init__(self, width, height):
        os.system('pkexec modprobe v4l2loopback devices=1 exclusive_caps=1 video_nr=5 card_label="vCam"')
        self.dev = os.open('/dev/video5', os.O_RDWR)

        vid_format = v4l2_format()
        vid_format.type = V4L2_BUF_TYPE_VIDEO_OUTPUT
        fcntl.ioctl(self.dev, VIDIOC_G_FMT, vid_format)
        vid_format.fmt.pix.width = width
        vid_format.fmt.pix.height = height
        vid_format.fmt.pix.pixelformat = V4L2_PIX_FMT_RGB24
        vid_format.fmt.pix.sizeimage = width * height * 3
        vid_format.fmt.pix.field = V4L2_FIELD_NONE
        fcntl.ioctl(self.dev, VIDIOC_S_FMT, vid_format)

    def __del__(self):
        os.close(self.dev)
        os.system('pkexec modprobe -r v4l2loopback')

Finally, we implement the convenient send button that will send an image to the device:

1
2
    def send(self, frame):
        os.write(self.dev, frame.data)

Background Remove

A new filter class will be created where we can send an image and it will apply the desired filter on the image and return it. For that, create a file named BackgroundRemove.py and add this template code to it:

 1
 2
 3
 4
 5
 6
 7
 8
 9
10
11
12
import cv2
import numpy as np
import tensorflow as tf

class BackgroundRemover():
    def __init__(self):
        pass


    def apply(self, in_frame):
        # Do the processing
        return in_frame

We will use the Deeplab v3 segmentation model to segment humans from the background. First, download the saved model graph file from here and extract the tar file. Then rename frozen_inference.pb to saved_model.pb. You can delete the other files in the extracted directory. Keep the extracted directory name to whatever you want, but change the name inside the code I show you below so it can find the saved model file.

We need to load the model file into a tf.Graph() object and use it as a function. Unfortunately, the model has trained on the Pascal dataset a long time ago when there was TensorFlow 1. So we need the tf.compat submodule to load the model using in TensorFlow 1 format and run it in a session (an old way to run a computation graph in TensorFlow 1.x).

So in the __init__ method, we create a tf.Graph(), use it as default, and load the model file into it. Then we create a tf.Session (or tf.compat.v1.Session for TF2) and set the graph as default in it.

 1
 2
 3
 4
 5
 6
 7
 8
 9
10
11
    def __init__(self):
        # Loading model into memory
        self.detection_graph = tf.Graph()
        with self.detection_graph.as_default():
            seg_graph_def = tf.compat.v1.GraphDef()
            with tf.io.gfile.GFile('deeplabv3_mnv2_pascal_train_aug/saved_model.pb', 'rb') as fid:
                serialized_graph = fid.read()
                seg_graph_def.ParseFromString(serialized_graph)
                tf.import_graph_def(seg_graph_def, name='')
        
        self.sess = tf.compat.v1.Session(graph=self.detection_graph)

The graph we just loaded can do a lot of things besides segmentation. But we will only use the segmentation which is labeled as SemanticPrediction in the graph. We set the index of the output of that label as the first (and only) one. So when we run the session, the output result will return a list with only a single element (the SemanticPrediction). The input to the graph is labeled as ImageTensor. So we set it to in_frame as a list. This is done inside the feed_dict parameter in Session.run() method.

The pixels labeled as a human are labeled as 15 in the segmentation map. We will only keep those pixels of the input image, and turn all other pixels to black. See the code below:

 1
 2
 3
 4
 5
 6
 7
 8
 9
10
11
12
13

    def apply(self, in_frame):
        # The graph only takes the image height of 513. And pads the image accordingly
        in_frame = cv2.resize(in_frame, (513, 384))
        with self.detection_graph.as_default():
            batch_seg_map = self.sess.run(
                'SemanticPredictions:0',
                feed_dict={ 'ImageTensor:0': [in_frame] }
            )[0]

        # mask the background
        in_frame[batch_seg_map != 15] = 0
        return in_frame

We have all the parts in place. Now we implement the driver program, the main method. In this method, we read the image, apply the background removing the filter and send it to the virtual camera. We can also see the processed picture to know if it’s working using cv2.imshow() function.

 1
 2
 3
 4
 5
 6
 7
 8
 9
10
11
12
13
14
15
16
17
18
19
20
21
22
23
24
25
26
27
28
29
30
31
32
33
34
35
import cv2
from VirtualCam import VirtualCam
from BackgroundRemove import BackgroundRemover


def main():
    cap = cv2.VideoCapture(0)
    vcam = VirtualCam(
        width=640,
        height=480
    )
    filter = BackgroundRemover()

    while True:
        # Read the image
        ret, frame = cap.read()
        # Convert to RGB
        frame = cv2.cvtColor(frame, cv2.COLOR_BGR2RGB)
        # Apply the filter
        frame = filter.apply(frame)
        # Send to virtual cam
        vcam.send(frame)
        # Display image on screen (Optional)
        cv2.imshow('frame', cv2.cvtColor(frame, cv2.COLOR_RGB2BGR))

        # Break the loop with 'q'
        if cv2.waitKey(1) & 0xFF == ord('q'):
            break
    
    # Clean up
    cap.release()
    cv2.destroyAllWindows()

if __name__ == '__main__':
    main()

Everything is good to go. Now run the program and you will see a window displayed your camera, Background Removed.

Note: If you see the model running very slowly, it is because you do not have a GPU, or you did the install TensorFlow correctly to use GPU. Please go to the Deep Learning with Tensorflow Lesson and try installing TensorFlow the proper way with CUDA enabled.

result

You can also keep the program running, and start the zoom application. In the settings, you can see your original camera blank and a new device named “vCam”.

To use it on windows, you will need to create a DLL that can register a DirectShow virtual Camera to the device manager. There is a python module for this here named pyvirtual cam. You can determine the operating system using the platform module in python and dynamically set the virtual camera based on which operating system your program is running on. Below is an example of virtual camera that works for both Windows and Linux. For windows, you will need pyvirtualcam and OBS virtual cam DLLs.

 1
 2
 3
 4
 5
 6
 7
 8
 9
10
11
12
13
14
15
16
17
18
19
20
21
22
23
24
25
26
27
28
29
30
31
32
33
34
35
36
37
38
39
40
41
42
43
44
45
46
47
48
49
50
51
52
53
54
55
56
57
58
59
60
61
62
63
64
65
import time
import numpy as np
import cv2
from FormatManager import convert_to
from FPSCounter import FPSCounter
import platform

if platform.system() == "Windows":
    from pyvirtualcam import _native_windows
    class _WindowsCamera:
        def send(self, frame: np.ndarray) -> None:
            super().send(frame)
            _native_windows.send(frame)

elif platform.system() == "Linux":
    import os
    import fcntl
    from v4l2 import (
        v4l2_format, VIDIOC_G_FMT, V4L2_BUF_TYPE_VIDEO_OUTPUT, V4L2_PIX_FMT_RGB24,
        V4L2_FIELD_NONE, VIDIOC_S_FMT
    )


class VirtualCam:
    def __init__(self, width, height):
        self.width = width
        self.height = height

        if platform.system() == "Windows":
            _native_windows.start(self.width, self.height, 30, 0)

        elif platform.system() == "Linux":
            self.device_path = "/dev/video5"
            self.dev = os.open(self.device_path, os.O_RDWR)
            vid_format = v4l2_format()
            vid_format.type = V4L2_BUF_TYPE_VIDEO_OUTPUT
            if fcntl.ioctl(self.dev, VIDIOC_G_FMT, vid_format) < 0:
                raise RuntimeError("unable to get output video format")

            vid_format.fmt.pix.width = self.width
            vid_format.fmt.pix.height = self.height
            vid_format.fmt.pix.pixelformat = V4L2_PIX_FMT_RGB24
            vid_format.fmt.pix.sizeimage = self.width * self.height * 3
            vid_format.fmt.pix.field = V4L2_FIELD_NONE

            if fcntl.ioctl(self.dev, VIDIOC_S_FMT, vid_format) < 0:
                raise RuntimeError("unable to set output video format")

    def release(self):
        if platform.system() == "Windows":
            _native_windows.stop()
        elif platform.system() == "Linux":
            os.close(self.dev)

    def __del__(self):
        self.release()

    def send(self, frame, frame_format):
        if platform.system() == "Windows":
            _native_windows.send(frame)

        elif platform.system() == "Linux":
            if os.write(self.dev, frame.data) < 0:
                raise RuntimeError("could not write to output device")

Conclusion

I just showed you how you can apply a machine learning model to your application. Instead of Background Removal, you can also apply other filters that are based on Machine Learning. Let us know different ideas you come up with by sharing them in the discussion section.

Share on

Rahat Zaman
WRITTEN BY
Rahat Zaman
Graduate Research Assistant, School of Computing